Contractor Work Order
The Contractor Work Order module is a key part of project execution in construction management.
It defines the scope of work, materials, timelines, and financials agreed between the company and the contractor.
In real-world construction, Work Orders (WOs) are used to:
- Assign specific construction, maintenance, or renovation tasks to subcontractors.
- Track labor, equipment, and materials required for a job.
- Define measurable deliverables tied to contracts and payments.
- Maintain regulatory compliance, safety, and inspection documentation.
Navigation Path
- Log in to the application.
- Go to the left menu and click Contractor.
- Click Work Order.
- Click the Add Work Order button to open the form.
Create Work Order – Form Fields
1. Select Project
- Choose the project for which the Work Order is being created.
- Only active projects will be listed.
2. Select Sub Contractor
- Choose the subcontractor who will execute the assigned work.
3. Select Contract
- Select an approved contract from the dropdown.
- Only contracts in Approved or Completed status are available.
4. Work Order Name
- Enter a descriptive name for easy identification (e.g., Electrical Installation – Tower B).
5. Parent Work Order
- If this is a continuation of a previous order, select the parent work order.
6. Work Order Type
- Select from available options such as Maintenance, Construction, Renovation, or Demolition.
(Configured for categorization and tracking different types of work activities.)
7. Work Order Category
- Select the category from the dropdown.
(Configured in Company Settings ➝ Construction ➝ Work Order Categories.)
8. Work Order Date
- Select the date on which the Work Order is issued.
9. Start Date / End Date
- Specify the planned start and completion dates.
- These dates determine scheduling, progress tracking, and delay analysis.
10. Approver
- Select the authorized approver from the dropdown.
(Configured in Company Settings ➝ Organisation ➝ Approvers.)
Priority
- Choose the urgency level – High, Medium, or Low.
- This helps project managers allocate resources and monitor critical jobs first.
Equipment Required
- Select Yes or No.
If “Yes,” it indicates that equipment or heavy machinery is needed (e.g., cranes, scaffolding, drilling rigs).
Estimated Labor Hours
- Enter the total estimated working hours required to complete the job.
- This helps in workforce planning and performance tracking.
Permit Number
- Enter the relevant permit number for the work.
- Permits ensure compliance with local construction, safety, and labor laws.
Inspection Status
- Select from: Not Started, Started, In Progress, Completed, or Rejected.
- This field helps track quality assurance and inspection readiness.
Regulatory Compliance
- Select one of the following: Fully Compliant, Partially Compliant, Non-Compliant, or Pending Review.
- This ensures the work aligns with government and safety standards.
Safety Checklist
- Enter or upload the safety checklist for this work order.
- This typically includes PPE usage, fall protection, fire safety, and hazard controls.
Subcontractor Info
- Add additional subcontractor details such as supervisor name, on-site contact, or work crew information.
Item Name*
- Select the item from the dropdown that is being supplied or used in the work order (e.g., Cement Bag, Rebar, Tiles).
Unit Price
- Enter the per-unit price for the selected item.
Quantity*
- Enter the number of units or quantity of work.
Amount Calculation
- The total amount is auto-calculated based on Unit Price × Quantity.
Tax*
Select applicable tax from the dropdown.
The system automatically calculates:
- Tax Amount
- Total Price
- Net Amount
- Total Tax Amount
- Grand Total
Currency Code
- Select the currency for this work order.
Attachments
- Upload related documents such as BOQs, drawings, or material approvals.
Description
- Provide any remarks or additional context related to the work order.
Note: For Creating a Work Order
Mandatory Fields:
- Project *
- Sub Contractor *
- Contract *
- Work Order Name *
- Work Order Type *
- Work Order Category *
- Work Order Date *
- Start Date *
- End Date *
- Priority *
- Item Name *
- Unit Price
- Quantity *
- Tax *
Work Order Workflow
- When created, the Work Order status is initially set to Draft.
- Once reviewed and approved, it automatically updates to Approved, Issued, or another applicable stage.
- The Work Order then becomes eligible for Invoice generation, where billing and payment tracking occur.
- Completed Work Orders feed data into Performance Reports and Contractor KPI dashboards for analysis.
- Revision or reissue is possible if work scope changes or materials are updated.
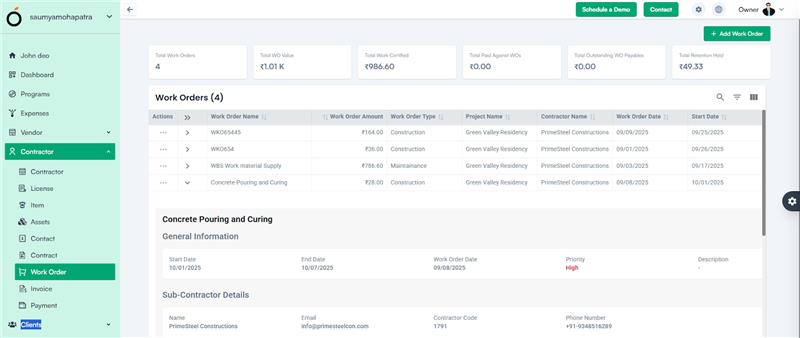
Each Work Order Record Displays
- Work Order Name
- Work Order Amount
- Work Order Type
- Project Name
- Contractor Name
- Work Order Date
- Start & End Date
- Priority
- Status
Available Actions:
- View – Open detailed work order information.
- Edit – Update work order fields.
- Delete – Remove the work order after confirmation.
Additional Features
- Search – Search by Work Order Number or Name.
- Sorting – Click column headers to sort by date, amount, contractor, or project.
Work Order KPI’s
- Total Work Orders – Total number of work orders created.
- Total Work Order Value – Combined financial value of all WOs.
- Total Work Certified – Amount of work approved after inspection.
- Total Paid Against WOs – Payments made to contractors.
- Total Outstanding WO Payables – Pending amounts yet to be paid.
- Total Retention Held – Retention value held back as per contract terms.
Next Steps After Work Order Completion
Once a Work Order is completed and approved, it automatically flows into the Invoice module:
- Generation of contractor invoices.
- Validation of completed work and payments.
- Linking of invoices with corresponding contracts for financial tracking.